Documentation
Everything you need to know about using Tickit to manage your tasks.
Installation
macOS
The fastest way to install on macOS — uses pre-built binaries:
brew install ricardodantas/tap/tickitLinux
Homebrew works on Linux too, or use Cargo:
brew install ricardodantas/tap/tickitcargo install tickitWindows
Install via Cargo or download the pre-built binary:
cargo install tickitOr download tickit-*-x86_64-pc-windows-msvc.zip from GitHub Releases.
From Source
git clone https://github.com/ricardodantas/tickit.git
cd tickit
cargo build --release
Requirements
- Rust 1.93+ (only for Cargo/source installation)
- macOS, Linux, or Windows
Quick Start
Get up and running in three simple steps:
Install Tickit
brew install ricardodantas/tap/tickitOr use cargo install tickit
Add your first task
tickit add "Learn Tickit"Launch the TUI
tickitUse j/k to navigate, Space to toggle completion, ? for help
Architecture
Tickit is a single binary that provides both CLI and TUI interfaces:
CLI Mode
Quick task management from the command line. Add, list, complete, and export tasks without entering the TUI.
TUI Mode
Interactive terminal interface for managing tasks, lists, and tags with keyboard navigation and 15 beautiful themes.
Data Storage
| File | Path | Purpose |
|---|---|---|
| Database | ~/.config/tickit/tickit.sqlite | Tasks, lists, tags storage |
| Config | ~/.config/tickit/config.toml | Theme and preferences |
Add Tasks
Create tasks with various options:
tickit add "Buy groceries"Options
| Flag | Description | Example |
|---|---|---|
-d, --description | Add a description | -d "With milk and eggs" |
-p, --priority | Set priority (low, medium, high, urgent) | -p high |
--due | Set due date (YYYY-MM-DD) | --due 2026-02-15 |
-l, --list | Assign to a list | -l Work |
-t, --tags | Add tags (comma-separated) | -t urgent,meeting |
-u, --url | Attach a URL | -u "https://..." |
Full Example
tickit add "Submit quarterly report" \
  -d "Include sales figures" \
  -p urgent \
  -l Work \
  -t deadline,q1 \
  --due 2026-03-31
List Tasks
tickit listOptions
| Flag | Description |
|---|---|
--all | Include completed tasks |
-l, --list <name> | Filter by list |
-t, --tag <name> | Filter by tag |
--json | Output as JSON |
# List all tasks including completed
tickit list --all

# Filter by list
tickit list -l Work

# Filter by tag
tickit list -t urgent

# Output as JSON
tickit list --json
Complete Tasks
tickit done <task-id>tickit list to see task IDs. The ID is shown at the beginning of each task line.
Manage Lists
# Show all lists
tickit lists

# Create a new list
tickit lists add "Shopping" --icon "🛒"

# Delete a list
tickit lists delete <list-id>Export
Export your tasks in various formats:
# Export to JSON
tickit export --format json > tasks.json

# Export to Markdown
tickit export --format markdown > tasks.md

# Export to CSV
tickit export --format csv > tasks.csv

# Export to todo.txt format
tickit export --format todotxt > todo.txt
Export Formats
| Format | Description | Use Case |
|---|---|---|
json | Full structured export | Backup, API integration |
markdown | Human-readable with checkboxes | Documentation, sharing |
csv | Spreadsheet compatible | Excel, Google Sheets |
todotxt | Standard todo.txt format | Other todo apps |
Update
Check for updates and install new versions directly from the command line:
tickit updateThe update command will:
- Check crates.io for the latest version
- Detect your installation method (Cargo or Homebrew)
- Automatically run the appropriate update command
TUI Overview
Launch the TUI with:
tickit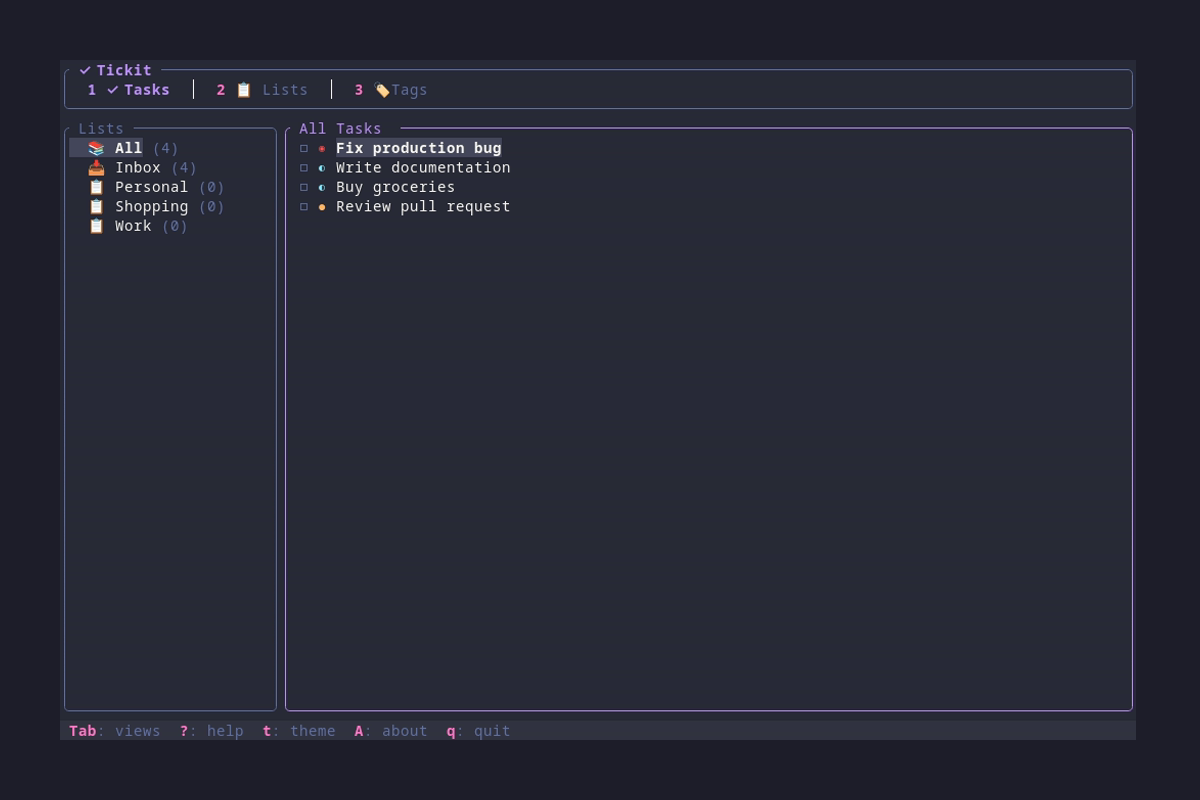
Task Editor
Press n to create a new task or e to edit the selected task.
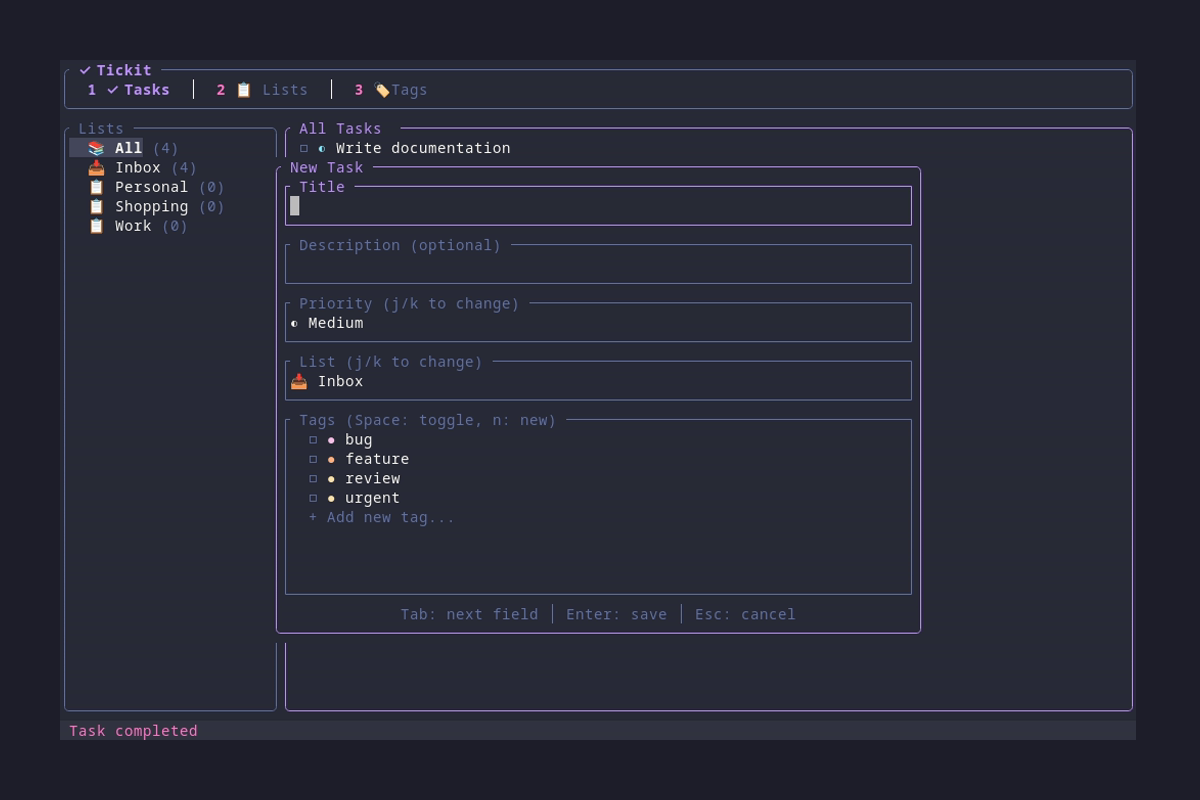
Editor Fields
| Field | Description | Input |
|---|---|---|
| Title | Task name (required) | Type text |
| Description | Optional details | Type text |
| Due Date | When task is due | Type YYYY-MM-DD |
| Priority | Low, Medium, High, Urgent | j/k to change |
| List | Which list to assign | j/k to change |
| Tags | Tag selection | Space to toggle, Enter on "+" to add new |
Due Date Indicators
Tasks with due dates show visual indicators in the task list:
- Red - Overdue (past due date)
- Yellow - Due soon (within 2 days)
- Gray - Future due date
Settings Dialog
Press s to open the Settings dialog where you can configure Tickit without editing config files.
Available Settings
| Setting | Description | Control |
|---|---|---|
| 🎨 Theme | Select color theme | Enter opens picker, ←/→ cycles |
| 🔄 Sync Enabled | Enable/disable sync | Enter or Space to toggle |
| 🌐 Sync Server | Server URL | Enter to edit, type URL, Enter to save |
| 🔑 Sync Token | API token | Enter to edit, paste token, Enter to save |
| ⏱️ Sync Interval | Auto-sync frequency | Enter cycles presets, ←/→ adjusts ±60s |
| 🔔 Notifications | Desktop notifications | Enter or Space to toggle |
| ✓ Show Completed | Default visibility | Enter or Space to toggle |
Settings Navigation
| Key | Action |
|---|---|
| j / ↓ | Move down |
| k / ↑ | Move up |
| Enter / Space | Toggle or activate setting |
| ← / → | Adjust value (theme, interval) |
| Esc | Close settings |
Keyboard Shortcuts
Navigation
| Key | Action |
|---|---|
| j / ↓ | Move down |
| k / ↑ | Move up |
| g | Go to first item |
| G | Go to last item |
| Tab | Switch focus (sidebar ↔ main) |
| 1 | Tasks view |
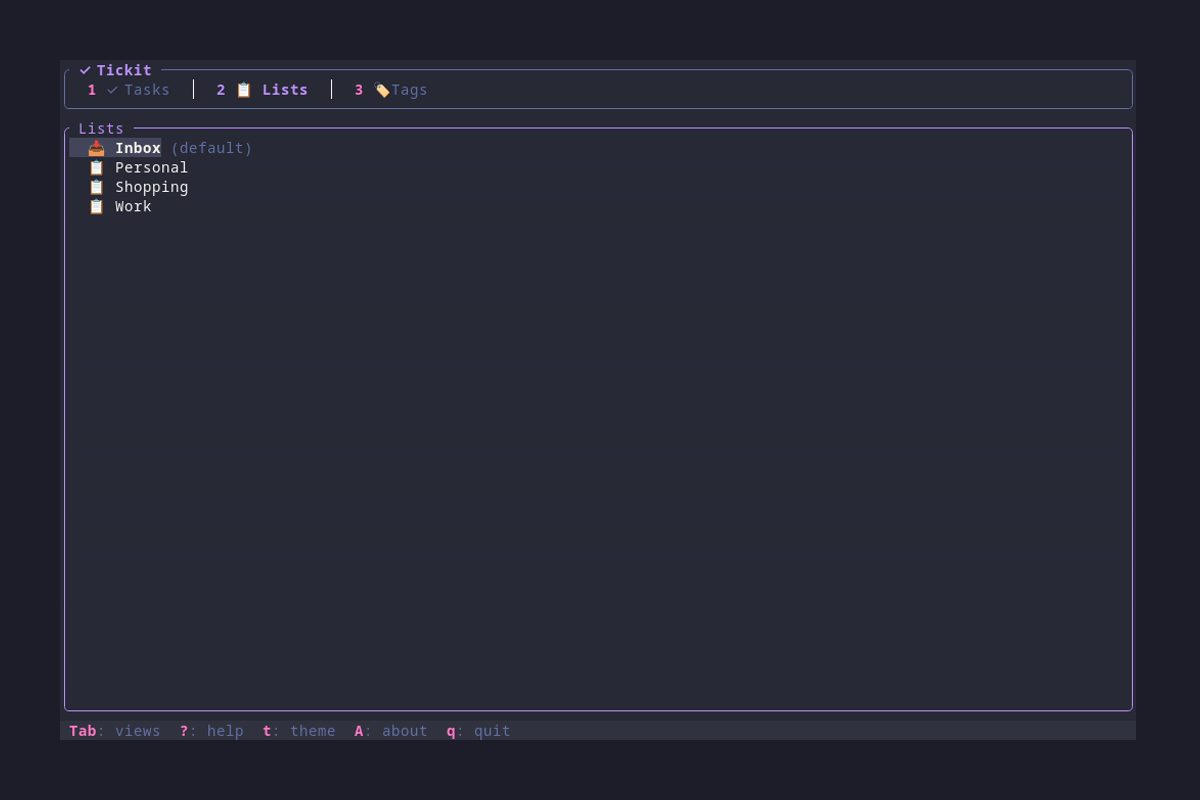
| 2 | Lists view |
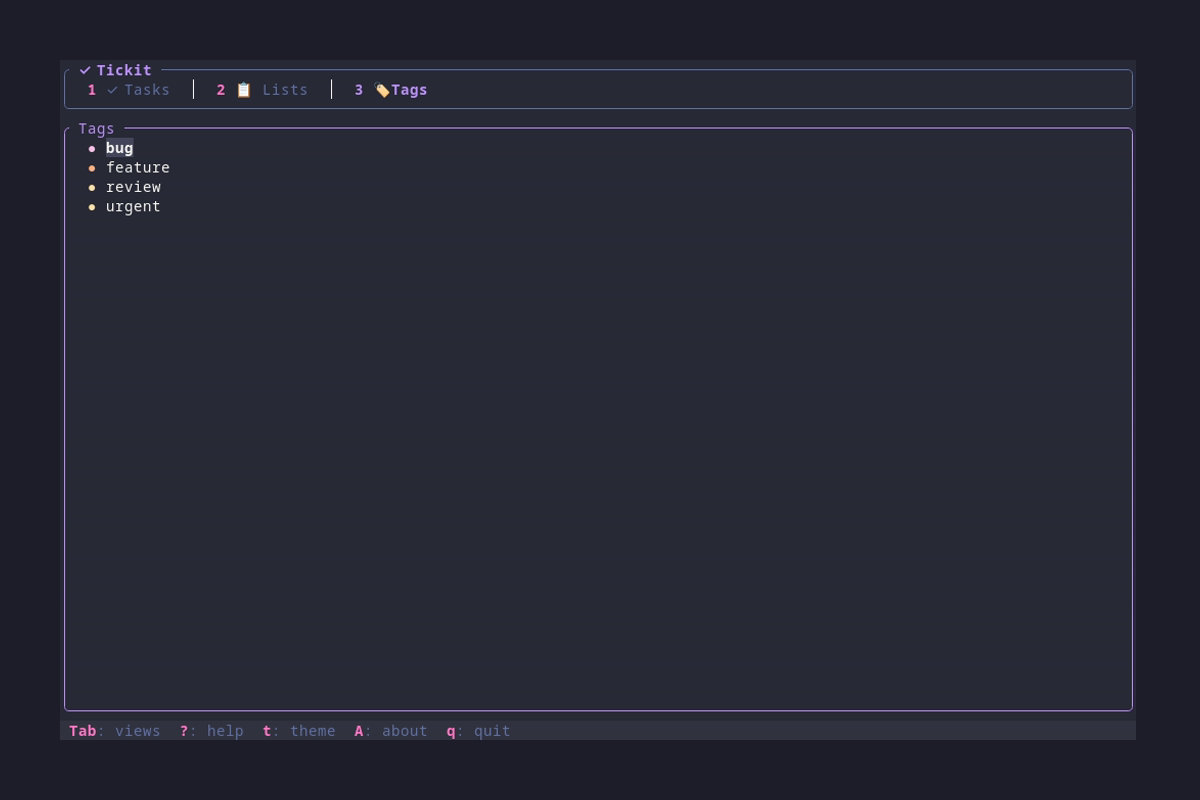
| 3 | Tags view |
Task Actions
| Key | Action |
|---|---|
| n | New task/list/tag |
| e | Edit selected |
| d | Delete selected |
| Space | Toggle task completion |
| o | Open task URL in browser |
| Enter | Select list in sidebar |
UI Controls
| Key | Action |
|---|---|
| s | Open settings |
| t | Open theme picker |
| c | Toggle showing completed tasks |
| ? | Show help |
| A | About dialog |
| S / Ctrl+s | Sync with server (if configured) |
| q | Quit |
| Esc | Cancel / Close dialog |
Task Editor
| Key | Action |
|---|---|
| Tab | Next field |
| Shift+Tab | Previous field |
| Enter | Save task |
| Esc | Cancel |
Config File
Tickit stores its configuration at:
~/.config/tickit/config.toml# Theme name (see themes page for options)
theme = "dracula"
# Show completed tasks by default
show_completed = false
# Desktop notifications for due tasks (default: true)
notifications = trueDesktop Notifications
When enabled, Tickit shows desktop notifications on startup for:
- Tasks due today — Shows priority emoji (🔴🟠🟡🟢) and task title
- Tasks due tomorrow — Only for high/urgent priority tasks (advance warning)
- Overdue tasks — Warning for tasks past their due date
Notifications work on Linux (DBus), macOS (Notification Center), and Windows (Toast notifications).
Themes
Tickit includes 15 beautiful built-in themes. Press t in the TUI to open the theme picker:
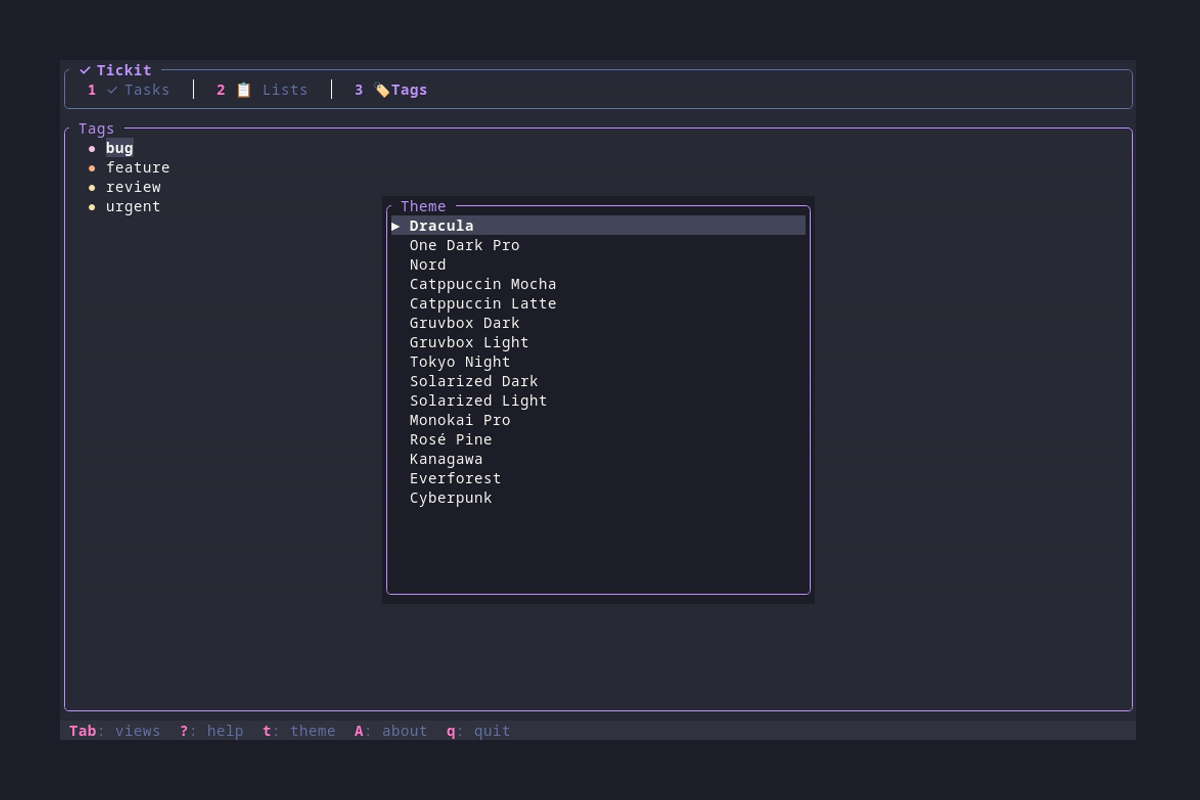
Available Themes
Sync Overview
Tickit supports optional synchronization across multiple devices using a self-hosted sync server. Sync is completely optional — Tickit works fully offline by default.
🔒 Self-Hosted
Your data stays on your infrastructure. No third-party services, complete privacy.
🔄 Multi-Device
Sync tasks, lists, and tags between desktop, laptop, and more.
📴 Offline-First
Changes sync when connection is available. Works fully offline.
How It Works
┌─────────────┐     ┌─────────────┐     ┌─────────────┐
│   Laptop    │     │   Desktop   │     │   Phone     │
│   Tickit    │     │   Tickit    │     │   (future)  │
└──────┬──────┘     └──────┬──────┘     └──────┬──────┘
       │                   │                   │
       │    HTTPS + Token  │                   │
       └───────────┬───────┴───────────────────┘
                   │
                   ▼
          ┌───────────────┐
          │  tickit-sync  │
          │    Server     │
          │   (SQLite)    │
          └───────────────┘
Server Setup
First, deploy the tickit-sync server on your infrastructure.
Quick Start with Docker/Podman
docker run -d \
  --name tickit-sync \
  -p 3030:3030 \
  -v tickit-data:/data \
ricardodantas/tickit-syncpodman run -d \
--name tickit-sync \
-p 3030:3030 \
-v tickit-data:/data \
docker.io/ricardodantas/tickit-syncInstall from crates.io
cargo install tickit-syncGenerate API Token
Each device needs its own API token. The token is automatically saved to the server config (hashed with Argon2):
# In Docker/Podman
docker exec tickit-sync tickit-sync token --name "my-laptop"

# Or if installed locally
tickit-sync token --name "my-laptop"
The command outputs the token and setup instructions:
✅ Generated API token for 'my-laptop'

Token: tks_abc123...

━━━━━━━━━━━━━━━━━━━━━━━━━━━━━━━━━━━━━━━━━━━━
📱 MOBILE APP (tickit-mobile):
   Settings → Sync Server: http://YOUR_SERVER_IP:3030
   Settings → Sync Token: tks_abc123...
   Settings → Sync Enabled: ON

💻 DESKTOP CLI (tickit):
   Press 's' to open Settings, then configure:
   • Sync Server: http://YOUR_SERVER_IP:3030
   • Sync Token: tks_abc123...
   • Sync Enabled: ON
━━━━━━━━━━━━━━━━━━━━━━━━━━━━━━━━━━━━━━━━━━━━
⚠️ Save this token now - it cannot be retrieved later!docker restart tickit-syncClient Configuration
Configure sync using the Settings dialog (press s) or manually edit ~/.config/tickit/config.toml:
Using Settings Dialog (Recommended)
- Press s to open Settings
- Navigate to Sync Server, press Enter, type your server URL
- Navigate to Sync Token, press Enter, paste your token
- Navigate to Sync Enabled, press Enter to enable
- Optionally adjust Sync Interval
Manual Configuration
[sync]
enabled = true
server = "https://sync.yourdomain.com"
token = "tks_your-token-here"
interval_secs = 300  # Sync every 5 minutes
Configuration Options
| Option | Description | Default |
|---|---|---|
enabled | Enable/disable sync | false |
server | URL of your tickit-sync server | — |
token | API token for authentication | — |
interval_secs | Auto-sync interval in seconds (0 = manual only) | 300 |
Manual Sync
In addition to automatic sync, you can trigger a manual sync at any time:
| Key | Action |
|---|---|
| S / Ctrl+s | Trigger manual sync |
Sync Status
The sync indicator on the right side of the status bar shows the current sync state:
- ↻ Syncing... — Sync in progress
- ☁ Synced — Last sync successful
- ⚠ Sync Error — Sync failed
- S: sync — Sync configured but not yet synced